This is our comprehensive guide on installing a bobbin into a Singer sewing machine. Both for new beginners who start sewing and experienced users, this content is essential and the process vital for smooth and effective sewing. This is a very detailed and authoritative write-up; in this article, we will show you everything you need to know, including how to set the bobbin and the sewing machine together with the sewing needle and the sewing bobbin threads. Here, we will also solve some of the most common issues you may have as you are threading and assist you in taking care of the sewing machine brand named Singer so that you get optimal results from it. We’ll first explain how to operate video materials, and then we will tell where such materials reside on the Internet. Are you ready to uncover the mysteries surrounding the perfect bobbin threading of the Singer sewing machine? Let’s get started!https://textile-yarn.com/pure-cotton-yarn/
What Are the Basic Steps to Wind the Bobbin on a Singer Sewing Machine?

What Are the Basic Steps to Wind the Bobbin on a Singer Sewing Machine
To begin with, winding the sewing machine bobbins is one of the basic procedures on a Singer sewing machine. Without this, the sewing will be done ugly as it will likely get interrupted. Now, here are the measures that might assist one in the completion of bobbin winding:
- Sewing Machine and Bobbin’s Preparation: Determine the type and size of the thread needed. At the most, just one bobbin would suffice, so ensure it is usable and free from debris or damage. The time has come to secure the bobbin onto the spindle. Ensure that it fits securely on the spindle.
- Securing Bobbins Onto a Singer Sewing Machine: The thread should go through the small hole in the bobbing center from one end. After doing this, a few inches of the tail should be left holding it. Put the displacement push onto the bobbin winder spindle, allowing it to be engaged with the bobbin winder.
- Using the Bobbin Winder Correctly: A few inches of the thread tail should be held tight and activated into the bobbin winder, which essentially starts the winding process. The thread should be guided with a hand at a reasonable pace to avoid complications. To finish off, once the bobbing gets enough coverage, activating the switch solves the problem.
If you strictly adhere to the above steps, you shouldn’t have a problem winding the bobbin on Your Singer sewing machine and using it for successful sewing.
Preparing the Bobbin and Sewing Machine
Preparing the necessary materials before you begin threading the bobbin on your Singer sewing machine is crucial, as ensuring the machine is set up correctly. Here are the answers to some common questions about preparing the bobbin and sewing machine:
How do I prepare the bobbin for winding?
- To wind the bobbin efficiently, hold the end of the thread tail and start the bobbin winding process by activating the bobbin winder. As the bobbin winds, guide the thread evenly with your hand to ensure smooth and uniform winding. Once the bobbin is adequately filled, stop the winder and cut the thread.
Following these guidelines, you can adequately prepare the bobbin and sewing machine, setting the stage for successful bobbin winding and sewing on your Singer machine.
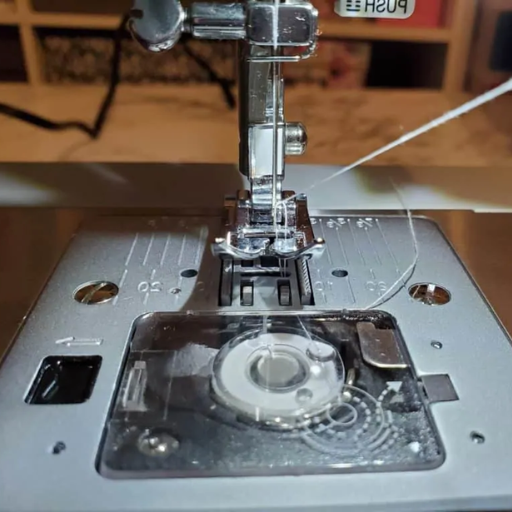
Inserting the Bobbin on a Singer Sewing Machine
One vital step in prepping your machine for sewing is ensuring that the bobbin is placed correctly in the Singer sewing machine. Here is a brief step-by-step process which will assist you;
- Find the Bobbin Case: It is usually located on the front of the sewing machine or one side. The cover of the bobbin case needs to be opened. At times, this may involve detaching the slide plate of an accessory storage compartment.
- Bobbing Preparation: The loose bobbin end should be wrapped around the top of the bobbin to ensure it does not unwind and keeps moving freely on its spindle while placed on the bobbin winder.
- Bobbing Case Threading: Reach for the bobbin case and remove the release lever or latch with one hand. Invoking the pre-fitting direction, insert the bobbing and hold the loose end of the thread. From there, simply pass the thread through the other required guides or tension discs.
- Case Positioning of Bobbin: With one of your hands grasp the case opening’s last protective layer and place the bobbin into the machine’s specified location, make sure the tail of the thread is still held tightly. Confirm that the bobbing case is also engaged and inserted in the sewing machine correctly.
- Installing a sewing machine needle threader: Before inserting the sewing needle, it is essential to ensure the sewing machine is correctly threaded, as explained in the instructions, according to the sewing machine’s model number. This usually involves threading the spool through the thread guides, tension discs, and the needle.
If you execute these steps, you should be able to place the bobbin on your Singer sewing machine before moving on to bobbin winding and sewing the machine. If additional details or advice is required on some aspects of the machine, kindly go through the user manual related to your particular Singer sewing machine model.https://textile-yarn.com/blog/acrylic-yarn-vs-cotton-yarn/
Please be aware that the technical parameters and details relevant to this subject may differ according to each particular Singer sewing machine model. You should read the user guide or check the Singer official page for accurate technical data and recommendations for your model.
Using the Bobbin Winder Efficiently
Winding machine bobbins without wastage ensures an enjoyable sewing experience using the Singer machine. I have been using a sewing machine for quite some time and I will explain in detail how to wind a bobbin properly:
- Selection of a Bobbin: First, select the appropriate bobbin that corresponds to the sewing machine model of your choice. If necessary, consult the user manual or the Singer website for the proper bobbin type.
- Insertion of Thread in the Bobbin: Slide the thread spool over the spool pin, then divert the thread lot through the available thread logical and reasoned guides. Subsequently, wrap the thread around the bobbin a couple of times.
- Locating the Bobbin Winder: Identify the area on your Singer sewing machine where the bobbin winding unit is situated. Push the bobbin winder into the bobbin winding position to put it on; ensuring it is held firmly in place is necessary.
- Bobbin Threading Speed: Most Singer models finish spooling a bobbin quite quickly, which allows you to regulate the speed. Refer to your user manual or the machine’s internal settings to change it according to the available setting speed.
- Beginning the bobbin winding: Depending on the type of your sewing machine, you can either use the foot pedal or turn on the winding function for the bobbin, in which case the thread will start to wind itself on the bobbin. Also, maintain the thread tension and adjust it where necessary.
- Observing during the bobbin filling: Make sure the bobbin makes an even and smooth wind as it winds. Do not make the wind too tight, as this could cause irregular tension as sewing takes place.
- Completing the bobbin winding: After the bobbin has been filled to the required level, there is no point in having the bobbin winding anymore; everything becomes the same. Cut the thread, take the bobbin out of the machine, and remove the winder that was on the bobbin.
Since there are differences in sewing models, even the technical aspects, such as bobbin winding speed, could be one of the differences. Sticking with these procedures and using trustworthy information sites will not make it hard to make bobbin winding and excellent sewing works.
How do you properly thread the Singer Sewing Machine?
How do you properly thread the Singer Sewing Machine
Threading the Singer Sewing Machine requires careful attention to detail to ensure smooth operation and optimal stitching results. Follow these steps to thread your machine correctly:
Setting Up the Thread Guides
The appropriate adjustment of the thread guides on your Singer Sewing Machine conversion obb provides an easy way of using the machine. Follow this sequence to guarantee the correct adjusting and positioning of the thread guides:
- Positioning of the Thread Guides: First, identify the thread guides on your machine. Look in the user manual for the specific guide for the machine’s location. Usually, there are thread guides above the spool pin, on the tension disks, and on the needle area.
- Threads and Anchor bolts: Owing to the fixed position on the right side of the fuselage, they can alternate on the other side depending on the instructor’s direction; begin with the timing, which entails threading the right side view by placing the bolt directly behind the reverse thread.
- Thread Tension: Looking directly a video claipt headed addressing attention given to blureau tension. The clear rod was parallel. Now, one joined only 10 degrees off point. The screen screw covering the antenna area increases the stress on some of the lead’s axis futility set to rotate extra metal.
- Thread Direction: Ensure that the thread follows the right direction, from the gold-headed screw down to the spindle area; this significantly enables the thread to flow evenly without straining the needle.
- Test Stitching: Once you have threaded the machine, do some test stitches on a scrap piece of fabric to check if the thread flows well and is well-balanced.
Look up any diagrams or instructions only in the user manual for your specific model of Singer Sewing Machine. Adhering to these guidelines will enhance your chances of stitching correctly and successfully.
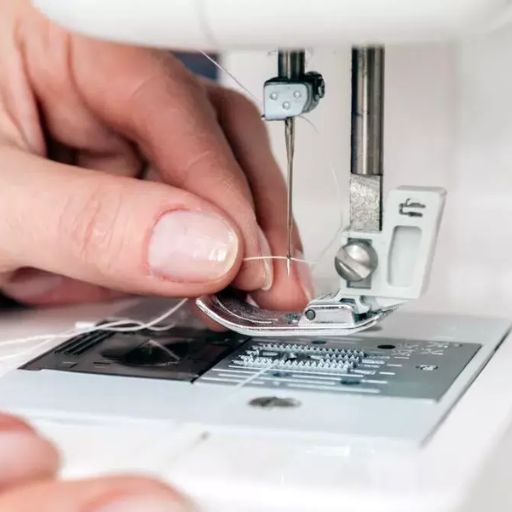
Threading the Needle and Bobbin Thread
The process of threading the needle and bobbin thread is quite intricate, as it is vital to prepare for smooth, cohesive sewing and finished stitches at the end. Some issues that may arise when threading the bobbin include the tangles of the bobbin thread and inappropriate insertion of the bobbin. To solve the problem of bobbin thread tangles, remove the bobbin case carefully and untangle the caught threads or loops. During an incorrect insertion of the bobbin, Consult the user instructions of your Singer Sewing Machine on how to place the bobbin correctly. Besides, problems with tension may alter the stitch quality. If you encounter tension complications, upper thread tension can be changed with the help of the tension dial located on your machine. As always, do test stitches first on scrap fabrics to check if the thread can pass freely through the materials and that proper balance exists between the yarn’s tension. Therefore, these simple tips, combined with the use of the right type of bobbin and the correct type of thread for heavy-duty sewing, caring for your Singer Sewing Machine correctly, and looking for some guides when you face troubles, will guarantee you get smooth sewing and accurate stitches. For visual guides or videos on threading, consider checking accounts to three platforms for thorough exposition and instructions for the super duty to relatively advanced models of the Singer sewing machine of your choice.
Checking and Adjusting Tension
When achieving optimal stitching results, checking and adjusting the tension on your Singer Sewing Machine is essential. Here are some common issues that may occur when threading the bobbin and how to address them:
Dealing with Bobbin Thread Tangles:
- Ensure that the bobbin is inserted correctly and securely.
- Check if the bobbin is wound evenly and without any loose threads.
- Verify that the bobbin tension is adjusted correctly. The tension should allow the thread to unwind smoothly from the bobbin without excessive resistance.
Fixing Incorrect Bobbin Insertion:
- Make sure the bobbin is inserted in the correct orientation as specified in the machine’s manual.
- Ensure the bobbin is placed in the bobbin case with the thread feeding in the correct direction.
- Double-check that the bobbin is correctly threaded through any necessary guides and tension discs.
Addressing Tension Problems:
- Adjusting the upper thread tension dial can help resolve tension-related issues. Gradually increase or decrease the tension until the stitching produces a balanced appearance.
- It’s essential to consider the fabric type and thread weight being used. Experimenting with different tension settings and making minor adjustments can help find the optimal tension for specific sewing projects.
- Remember that the specific tension settings may vary depending on the fabric thickness, stitch type, and desired outcome. Refer to your machine’s manual for recommended tension ranges and adjust accordingly.
By paying attention to these factors and making necessary adjustments, you can ensure proper tension and achieve consistent and professional-looking stitches with your Singer Sewing Machine.
What Common Issues Might Occur When Threading the Bobbin?
Some users of the Singer sewing machine encounter problems when threading the bobbin. A few of them are described below, along with their remedies:
- Bobbin Thread Tangles. If the bobbin thread has been looped or twisted, moisten it and check the bobbin again. Also, ensure the bobbin tension is properly wound, and the thread is correctly passed through the case and the tension spring.
- Improper bobbin insertion is another common mistake that can lead to faulty sewing. The correct way to insert a bobbin is to place it in such a direction that when contact is made with the tension spring, the sewing thread is taken round the spring.
- Tension Problems. Excessive tension settings will result in loose and uneven stitches. After the case cover has been closed, examine the threaded upper thread and check that it is correctly inserted in the tension discs. Subsequently, set the tension dial properly for stitch and fabric requirements.
Such problems can easily be resolved, which will, in turn, help in the easy threading of the bobbin, which translates to good stitch quality when the Singer sewing machine is used.
Dealing with Bobbin Thread Tangles
Tangling caused by bobbin thread is standard but can be avoided with the transmission of certain techniques; one of the common forms is the Tangling of the sewing thread. Below are some of the galactic solutions to dealing with this problem:
- Bobbin Compatibility Check: Check the measurement of the bobbin spool being used and ensure it is compatible with the project being sewed in the Singer sewing machine. Failure to do so will result in tangled threads or a bad stitch.
- Correct Bobbin Sizing: Always refer to the sewing machine’s instruction manual regarding the bobbin’s positioning inside the bobbin casing. Follow the instructions on correct loading to avoid jamming or tangling.
- Tension Settings: Verify the bobbin thread’s tension adjustments prior to sewing, as too loose or too tight thread might form tangles. To understand the specifics of how to fix that problem, read the manual – loosen or screw the bobbin tension screw slightly,y depending on the situation.
- Ever Increasing Yarn Feed: Following the first point mentioned earlier, smooth spinning off the bobbin thread during sewing is essential to avoid tangles; it’s also vital to check and examine other areas in case some particles cause the tangling.
In conclusion, these tips can help avert and eliminate tangling using a Singer sewing machine, allowing for a far easier sewing experience.
Fixing Incorrect Bobbin Insertion
Correct bobbin insertion is crucial for smooth sewing with your Singer sewing machine. Here are some answers to common questions regarding this issue:
How do I insert the bobbin correctly?
- The tension for the bobbin thread should be adjusted to achieve balanced stitching. Consult your machine’s manual for guidance on adjusting the bobbin tension screw. Start with slight adjustments, tightening, or loosening as needed.
By following these guidelines and referring to your machine’s manual, you can fix incorrect bobbin insertion and prevent thread tangles, ensuring smooth and hassle-free sewing with your Singer sewing machine.
Addressing Tension Problems
The former guideline applies to any issues with bobbin thread tension on a Singer sewing machine, as it is necessary to point out the need for tensioning to achieve balanced stitches when altering the machine’s settings. In this situation, the sequence of correcting the tension is illustrated below:
- Refer to the Machine Manual: To begin with, the user is expected to Note the sewing machine’s model number and seek assistance from the manual regarding adjusting the bobbin tension. This does impact the various processes.
- Adjust it Gradually: As the process of regulation exposes the user to the possibility of difficulty, it is recommended to take the easy way out by regulating the bobbin tension screw by a small amount. Then, some stitches were sewn on leftover material, and the result was examined. Investigate if the stitches are balanced at that point, and if not, gradually tighten or loosen the tension until balanced stitches are obtained.
- Technical Parameters (if applicable): Depending on your machine model, the stitches might have some specific technical parameters that dictate the elasticity of the bobbin thread once it has been used, which include the following;
- Bobbin Tension Screw: Find the bobbin Tension screw and make use of a small screwdriver to adjust it.
- Recommended Range: Yeah, I saw, so Black, help me out, Harley: The novice sewing machine user is comoderro expects the tension specified within Black and not the rate Black only, as users of the intermediate machine tension are directing if manual is mad.
- Balanced Stitch and Their Beautification: The sewing machine user should also expect the surplus to be as close as possible to the cost inside the minute. If a balance is struck, stitch formation necessarily becomes balanced.
If you need to troubleshoot tension issues and achieve smooth sewing on your sewing machine, follow these suggestions along with your machine’s manual. Also, remember to practice on test pieces before turning to the actual work for the best stitching effectiveness.
How Can I Ensure Smooth Sewing with a Singer Heavy-Duty Machine?
How Can I Ensure Smooth Sewing with a Singer Heavy-Duty Machine
When using a Singer heavy-duty machine, there are several key factors to consider to achieve smooth sewing results:
Using the Right Bobbin and Thread for Heavy-Duty Sewing
It is essential that you sew with a thread compatible with the bobbin and the project you wish to complete. Below are some points to remember when sewing with your Singer heavy-duty machine.
- Bobbin—It is best to use metal bobbins rather than plastic ones when sewing. This is important to sustain greater durability, especially when sewing with thicker fabrics, threads, or multilayers since plastic bobbins are weaker.
- Thread—Make sure to pick a strong thread with the maximum number of stitches to ensure that it does not break. A good tip for picking the thread is to look for ones that say ‘heavy standardized’ ‘extra strong’, and industrial strength because they often tend to have polyester or a blend of polyester, which is known to sustain greater force.
- Thread weight—The weight of the thread matters significantly since it depends on the project. For instance, if the project is larger and contains multiple fabrics, then using thicker threads is wise. Since every machine has different requirements on the range of threads it is compatible with, I would suggest looking at the manual to avoid going outside the stated range.
- A needle that can work for heavy-duty sewing is essential. This is because the needle needs to be compatible with the fabric so its weight is not an issue while stitching. However, if needles are not used securely, issues such as fabric damage and missing stitches will occur easily.
When choosing a bobbin, thread, and needle for heavy-duty sewing, the recommendations of the machine’s manual should be followed. In addition, the technical parameters, such as the thread weight range and needle size used, appropriate for your Singer heavy-duty machine, should also be taken onboard. Embracing the right mix of a bobbin, thread, and needle will ensure the best performance and smooth sewing results with your Singer heavy-duty machine.
Maintaining the Singer Sewing Machine for Optimal Performance
Regular maintenance and care should be taken to preserve the good performance of your Singer sewing machine. Maintenance practices should include the following steps:
- Cleaning and Lubrication: Always ensure that the machine is cleaned and that all lint or dust particles that may have collected around the bobbin case, feed dogs, and even the needle are removed. Follow the general maintenance instructions given by the manufacturer regarding the lubrication of the machine.
- Needle and Thread: Remember to change the needle in a Sache if it becomes curved or blunt due to wear and tear, as this determines the quality of the stitch. Using the right size and type of needle as per the fabric is a good practice. The thread should also be appropriate for the sewing machine and fabric used.
- Bobbin Care: Clean the bobbin case and tension area regularly to prevent lint or other debris from building up. The bobbin should be evenly wound and inserted correctly by the machine’s instructions.
- Tension Adjustment: The stitches cast should be balanced; therefore, the thread should not be too tight. Each stitch type and fabric requires tension adjustment; always check the machine’s manual for assistance.
- Regular Servicing: You may also consider having your Singer sewing machine serviced periodically by a technician so that all internal parts of the machine are kept in proper condition.
If you have a Singer sewing machine and do not know how to thread it, there is no reason to panic since many people can assist you. Websites like YouTube have many tutorials that are done by professionals who are ready to help you tackle the threading process. Also, most of the time, the official manufacturer’s website has some form of online guidance or tutorial explaining how to thread your particular model in great detail through pictures and descriptions.
However, it is also worth mentioning that some technical indicators, such as thread weight range and the size of the needle, may differ depending on the model of your Singer sewing machine. It would be wise of you to get the user manual of your machine, as it has verified information regarding its specifications. You can also check the official Singer website for the specifications.
Tips for Troubleshooting Sewing Issues
When encountering sewing issues with your Singer sewing machine, here are some helpful tips to address common problems:
Uneven or skipped stitches:
- Adjust the stitch length and width settings on your machine as desired.
- Ensure the fabric is guided correctly and not pulled or pushed against the machine.
Remember, specific troubleshooting steps may vary depending on your Singer sewing machine model and the nature of the issue. Consult your machine’s user manual for detailed instructions tailored to your model. For any technical specifications related to threading, thread weight range, or needle size, refer to the official Singer website or contact customer support for accurate and reliable information.
Where Can I Find Visual Guides or Videos for Threading a Singer-Sewing Machine?
Where Can I Find Visual Guides or Videos for Threading a Singer-Sewing Machine
For visual guides and instructional videos on threading a Singer sewing machine, there are several reliable sources you can refer to:
Watching Instructional Videos on YouTube
It is thought that it can be hard to throw a Singer sewing machine. However, many channels on Youtube help with sewing tutorials: this Signers dependencies or other standalone creators. Plugging into Youtube videos such as ‘threading singer [model number]’ also provides multiple threading videos focused on that model. Additionally, ensure you obtain the instructions from reliable sources; for instance, book this machine here on my YouTube or sewing channel with the threading machine you need.
Accessing support pages where the manufacturers have prepared tutorials on their official sites is a valuable source. YouTube, the first model, and the cap odd worker try the Live Singer sewing sites, which provide a complete document connection that other models also use. Of course, you may also go to the sewing machine site, find the support or tutorial section, and get instructions, pictures, and graphs dedicated to your model.
Another critical step is to read the user manual descriptions in detail to understand how to thread a Singer sewing machine correctly. The user guide provided alongside your machine contains instructions and diagrams explaining how to thread your machine. It encompasses essential specifics like the thread route, tension settings, and needle insertion. So, consult your Singer sewing manual and the procedures provided there. The manual should be able to provide optimal and relevant details regarding your machine type so that you do not have any difficulties getting your Singer machine threaded correctly and appropriately.
Accessing Manufacturer’s Online Tutorials
I advise looking for Singer sewing machine threading tutorials on the company’s official website, as there is a lot of detailed information, pictures, and diagrams explicitly aimed at your sewing machine. This site also shows the most correct guidelines for threading the Singer model which is the Singer site, therefore it has the most reliable information available anywhere. Some key technical parameters to consider while threading your Singer machine may include:
- Thread Path: The online tutorial will also explain the thread’s proper path from the tension disks to the needle through the thread guides.
- Tension Adjustments: One of the tutorials might include adjusting thread tension to achieve high-quality stitches using batik fabric and thread. It may illustrate how to alter the settings of the tension dial or tension disks.
- Needle Threading: Whether crisscrossing, zig-zag, or sewing straight lines, it is important to thread the needle right to ensure smooth sewing. Tutorials may describe the right steps, such as placing the thread over the needle’s eye and securing it to the sewed piece.
Reading Detailed User Manual Descriptions
Assembling Singer sewing machines is entirely dependent on the manual, especially the detailed one, which describes how a thread should be appropriately threaded through the various parts of the machine; this includes but is not limited to the tension disks, thread guides, and the needle. Tension modification is also an aspect that should be considered when enhancing the stitching standard. For instance, the guidelines on adjusting the tension dial or tension disks depending on the fabric or thread used should be followed carefully. Properly threading the needle is also a very vital part of successful sewing. In this case, be attentive to the instructions regarding the line-up of the thread with the eye of the needle and how to hold it tight.
Remember that the technical parameters involved are bound to change with every specific Singer sewing machine model. For the exact information for the specified machine, do not forget to visit the official Singer website and check out the tutorials designed for your model. This
Frequently Asked Questions (FAQ)
Q: What is the first step in threading a bobbin on a Singer sewing machine?
A: The first step is to make sure your machine is turned off, and the presser foot is in the up position. This ensures the safety and proper threading alignment.
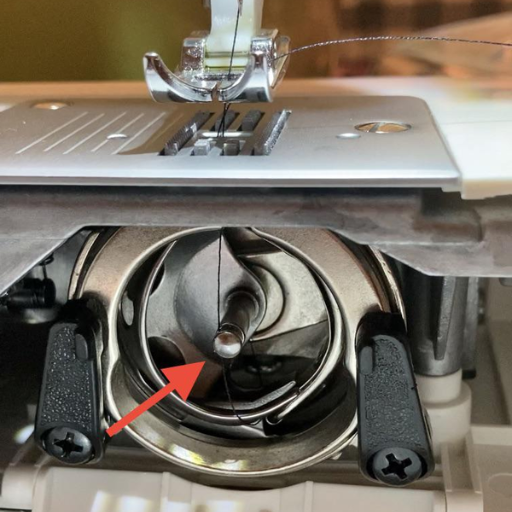
Q: How do I properly insert the bobbin into the bobbin case?
A: Hold the bobbin with one hand and place it into the bobbin case. Make sure the thread is pulling in the correct direction, usually clockwise, and then pull the thread through the slit and under the tension spring.
Q: How can I be sure the bobbin is threaded correctly?
A: After inserting the bobbin, pull the thread slightly to ensure it moves smoothly. Also, check your inbox or instruction manual for specific threading tips or diagrams for your Singer model.
Q: What should I do if the thread keeps tangling around the bobbin?
A: Ensure the bobbin is wound evenly and the thread correctly placed in the bobbin case. If tangling continues, consult a sewing machine tutorial or the Singer Stylist 4423 manual for troubleshooting tips.
Q: How do I engage the bobbin winder on a Singer sewing machine?
A: Place an empty bobbin on the bobbin winder pin and push it to the right. Hold the thread from the thread spool, guide it around the bobbin winder tension disc, and press the foot pedal to begin winding.
Q: What is the purpose of the presser foot when threading a bobbin?
A: The presser foot holds the fabric in place while sewing, but it should be up when threading the bobbin to ensure the needle thread doesn’t interfere with the bobbin thread.
Q: How do I know when to stop winding the bobbin?
A: The bobbin winder will automatically stop when the bobbin is full. You can also visually check and stop the winder when the thread reaches the edges of the bobbin, forming a smooth, even layer.
Q: Can I use any bobbin with my Singer sewing machine?
A: Using Singer brand bobbins compatible with your specific model, such as the Singer Stylist 4423 is recommended. Using non-compatible bobbins can cause issues with threading and tension.
Q: Why is it important to check the threading direction of the bobbin?
A: Incorrect threading direction can cause tension problems and affect stitch quality. For optimal performance, the thread should unwind from the bobbin in a specific direction, usually clockwise.
Recent Comments